Leading Beverage Company Enhances Web Application Performance and Security with AWS
- by tegeria
- Apr 5, 2024
The customer is a leading entity in the non-alcoholic beverage industry. Since 1994, they have been a key player in the market, producing and distributing a wide range of popular beverages. Their extensive portfolio includes well-known international brands, and they are recognized for their significant contributions to the local economy. Committed to leveraging advanced digital technologies, the customer aims to improve operational efficiency and enhance customer engagement.
The Challenge
The customer faced a multifaceted challenge in optimizing their React.JS web application. They needed a solution that was both cost-effective and highly available, designed to boost performance while efficiently managing cache utilization. The existing system struggled with performance issues, particularly under high traffic volumes, leading to slow load times and a subpar user experience. Additionally, they required stringent access controls to restrict site access to a specific list of client IP addresses, all without the need for complex networking configurations. Addressing these challenges was crucial for improving the user experience and ensuring robust security.
The Solution
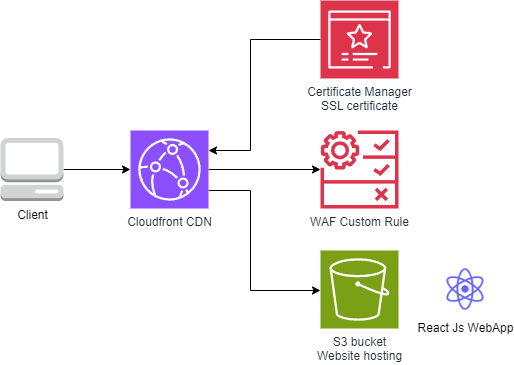
To meet the customer’s needs, we implemented a comprehensive and scalable AWS-based solution tailored to their specific requirements:
Hosting with Amazon S3: We used Amazon S3 to host the static content of the customer’s React.JS application. The static website hosting feature of Amazon S3 provided a reliable foundation for serving web content. This setup offered cost-effective storage and high availability, with S3’s architecture ensuring fault tolerance and automatic scaling. This allowed the customer to handle varying traffic levels without compromising performance. The ease of integration with other AWS services also streamlined the deployment process and facilitated efficient management of static assets.
Performance Optimization with AWS CloudFront: To enhance performance, we integrated AWS CloudFront as a Content Delivery Network (CDN) in front of the S3 bucket. CloudFront’s global edge locations cache copies of the website’s static content, reducing latency by serving content from locations closer to users. This global distribution significantly improved load times and provided a smoother user experience. Additionally, CloudFront’s advanced features, such as real-time metrics and analytics, allowed us to monitor and fine-tune content delivery. We also implemented HTTPS encryption using a custom SSL certificate managed by AWS Certificate Manager (ACM), ensuring secure data transmission and adherence to industry standards.
Advanced Security with AWS WAF: For stringent access control, we deployed AWS WAF (Web Application Firewall) to manage IP-based restrictions. Using AWS WAF’s Rule Builder, we created a custom rule that permitted traffic only from a specified set of whitelisted IP addresses. This setup effectively blocked any requests not originating from these approved IP addresses, ensuring that only authorized users could access the web application. The AWS WAF solution was designed to be user-friendly, avoiding the need for complex networking knowledge while providing robust security.
Integration and Testing: Throughout the implementation, we conducted thorough testing to ensure seamless integration between S3, CloudFront, and WAF. This included validating that the CDN effectively cached and delivered content as expected and that access controls were enforced accurately. We also worked closely with the customer to configure and fine-tune settings based on their specific traffic patterns and security requirements.
The Outcomes
The AWS-based solution brought significant improvements to the customer’s web application. Performance was notably enhanced, with page load times reduced by up to 60% due to CloudFront’s efficient content delivery. Scalability and reliability were greatly improved, allowing the website to handle high traffic volumes smoothly. Security was reinforced with AWS WAF, which successfully restricted access to only the whitelisted IP addresses, mitigating potential threats. Additionally, the cost-effective nature of S3 and CloudFront resulted in a reduction in hosting and operational costs by approximately 40%, providing substantial savings while meeting all performance and security requirements.
About the Partner
Tegeria is a global digital transformation company with a center of excellence in Europe. Our expertise lies in creating high-performance, scalable, and secure AWS infrastructures tailored to meet the unique needs of our clients. With a focus on delivering technical excellence and ensuring customer success, Tegeria helps businesses like the beverage company achieve their digital transformation goals efficiently and effectively. Our deep understanding of AWS services and proven track record make us a trusted partner in leveraging AWS for optimal results.
Leave a Reply